You can make your own glue dots by dropping blobs (any size you like) of Aleene's Tack It Over and Over glue onto parchment paper.I did this and folded the excess waxed paper over top, once they were 'dry'. All I have to do is open up the parchment paper, pick off one of the blobs and use like regular store-bought glue dots.
Here is what a bottle of it looks like at the store and it only costs about $4.

Here is a video and detailed instructions to show how it is done from Stampbusters Site that I found on the net.
The Aleene’s Tack-It Over and Over dried almost clear, with a tinge of yellow. I tried wax paper, freezer paper and parchment paper. The wax and freezer paper did not release the dots as easily and I had to pick them off with more effort than I would want to put up with. Parchment paper worked great!
You can make all sizes of glue dots, which is a real bonus of making them yourself. Using the 1″ strips of parchment paper I cut, I used the glue to ‘draw’ long, skinny dashes for holding ribbon on a stamped project. I made jumbo dots, itty bitty dots and even little “corners” that looked like an upside down V, perfect for corners of a card!
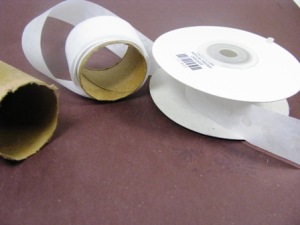
To store them, I tried 3 methods. You know how you can buy glue dots on a square piece of paper? I made some on 4×4 parchment. I really didn’t like using them off of the sheet as I kept getting them on my knuckles, which was giving my twitches. I like them on a roll MUCH better! I cut 1-1/2″ off of an empty paper towel roll and used Scotch tape to fasten it to the roll and piece the strips together.
My favorite solution was to use an empty 1″ribbon roll. It kept the exposed glue dots from landing on things that shouldn’t be glued and there is good amount of depth to roll on lots of dots!
Do they hold as well as store bought glue dots? I put them to the test with buttons and wide ribbon. The homemade glue dots seemed to have a bit more play in them when I tried to wiggle the button but held on well. Even under a hot light and against gravity, they still held the ribbon to the card. Note: Aleene’s glue does not say if it is archival, so I wouldn’t use it for scrapbooking or anything like that.
Would I make more of them? Actually, I think I might. Especially for swaps since I can make so many of them so cheaply and in any size I need. A bottle is around 3 or 4 bucks and I barely made a dent in it to make 500 dots! Of course they aren’t exactly the same as the store bought, but if you are in a pinch or on a budget, give ‘em a try!
Also the dots can be moved before they 'set' so, if you get a wrong placement, at first, you can pick them off and move them."


10 comments:
Oh I love this idea!! I am definately going to have to try this. I wonder if you can also heat emboss with these "glue dots" like you can with the others? Thank you so much Stefan!
ugh!! Can't type with a headache,, Stefen! Can you see my shaking my head? lol Well lightly shaking hehehe
wonderful tip...thanks for sharing
This is good to know, Stefan. Great how-to blog! Aleen's is acid-free, so you're good to go with it.
Fantastic..... now to find something similar here in NZ.... ;)
Debbie #352
Love your blog! Welcome to the "All Things Tim" group; I'm kind of a lurker over there! I can't imagine what it would be like to be the only guy in a sea of women at a crop. Kudos to you for going and preserving memories for your two boys! Congratulations and keep up the great blog!
I tried it....it worked! I used the old paper from my adhesive gun and my used glue dots . recycling at its best! thanks for saving me tons of $$$$ Love your blog
I do this, too!
I have found that the backing from the priority mail stickers and the backing from the "paid for" stickers from the grocery store (the ones the checker puts on your cases of coke or jugs of milk etc) work great, too!
I let it dry and top with another piece of the same paper strip and then eyeball the size and tear it into smaller strips and store them in a baggie.
When scrapping, I just save and re-use the strips in the same baggie.
Wow what a great idea Stefan, thanks for sharing.
Question about the glue though, what kind of glue is it? I wonder if theres an alternative over here in the UK?
Thanks.
Great idea!!!
Post a Comment